
Instructions for deploying the Squonk2 application suite, consisting of the Account Server, Data Manager, and its Operators to a local Kubernetes cluster (Minikube, Docker Desktop or Rancher Desktop). Instructions for the installation of a local Kubernetes cluster can be found on the Data Manager Wiki’s Development Policies section.
A working knowledge of the following will prove extremely beneficial: -
- Kubernetes
- Ansible, specifically the Ansible role playbook structure
Background
Squonk2 consists of: -
- An Account Server and its API (the AS) to manage
- Organisations and Units
- Product Subscriptions and associated Charges
- Assets
- Event Streams (via a separate Event Streaming Service deployment)
- The Data Manager Service and its API (the DM)
- A Job operator to run DM jobs
- A Jupyter" operator to run Jupyter notebook server
- The Graphical User Interface (the UI)
Squonk2 also relies on an infrastruture deployment to provide a database server (PostgreSQL), Keycloak authentication service, and messaging service (RabbitMQ) that is shared between the AS and DM.
Here we discuss the deployment of a local infrastructure (that relies on Keycloak in out AWS cluster), and the deployment of Squonk2.
Configuration of the application components is achieved using Ansible playbooks. Some deployments, due to their complexity, have a large number of playbook variables but a basic set is provided in each of the playbook repositories in a parameters-local.yaml file.
You are encouraged to review each application’s variables, which are accompanied by in-line documentation, in the defaults/main.yaml and vars/main.yaml files in each repository’s roles directory. As a matter of style we put common user-definable variables in defaults and less common variables in vars.
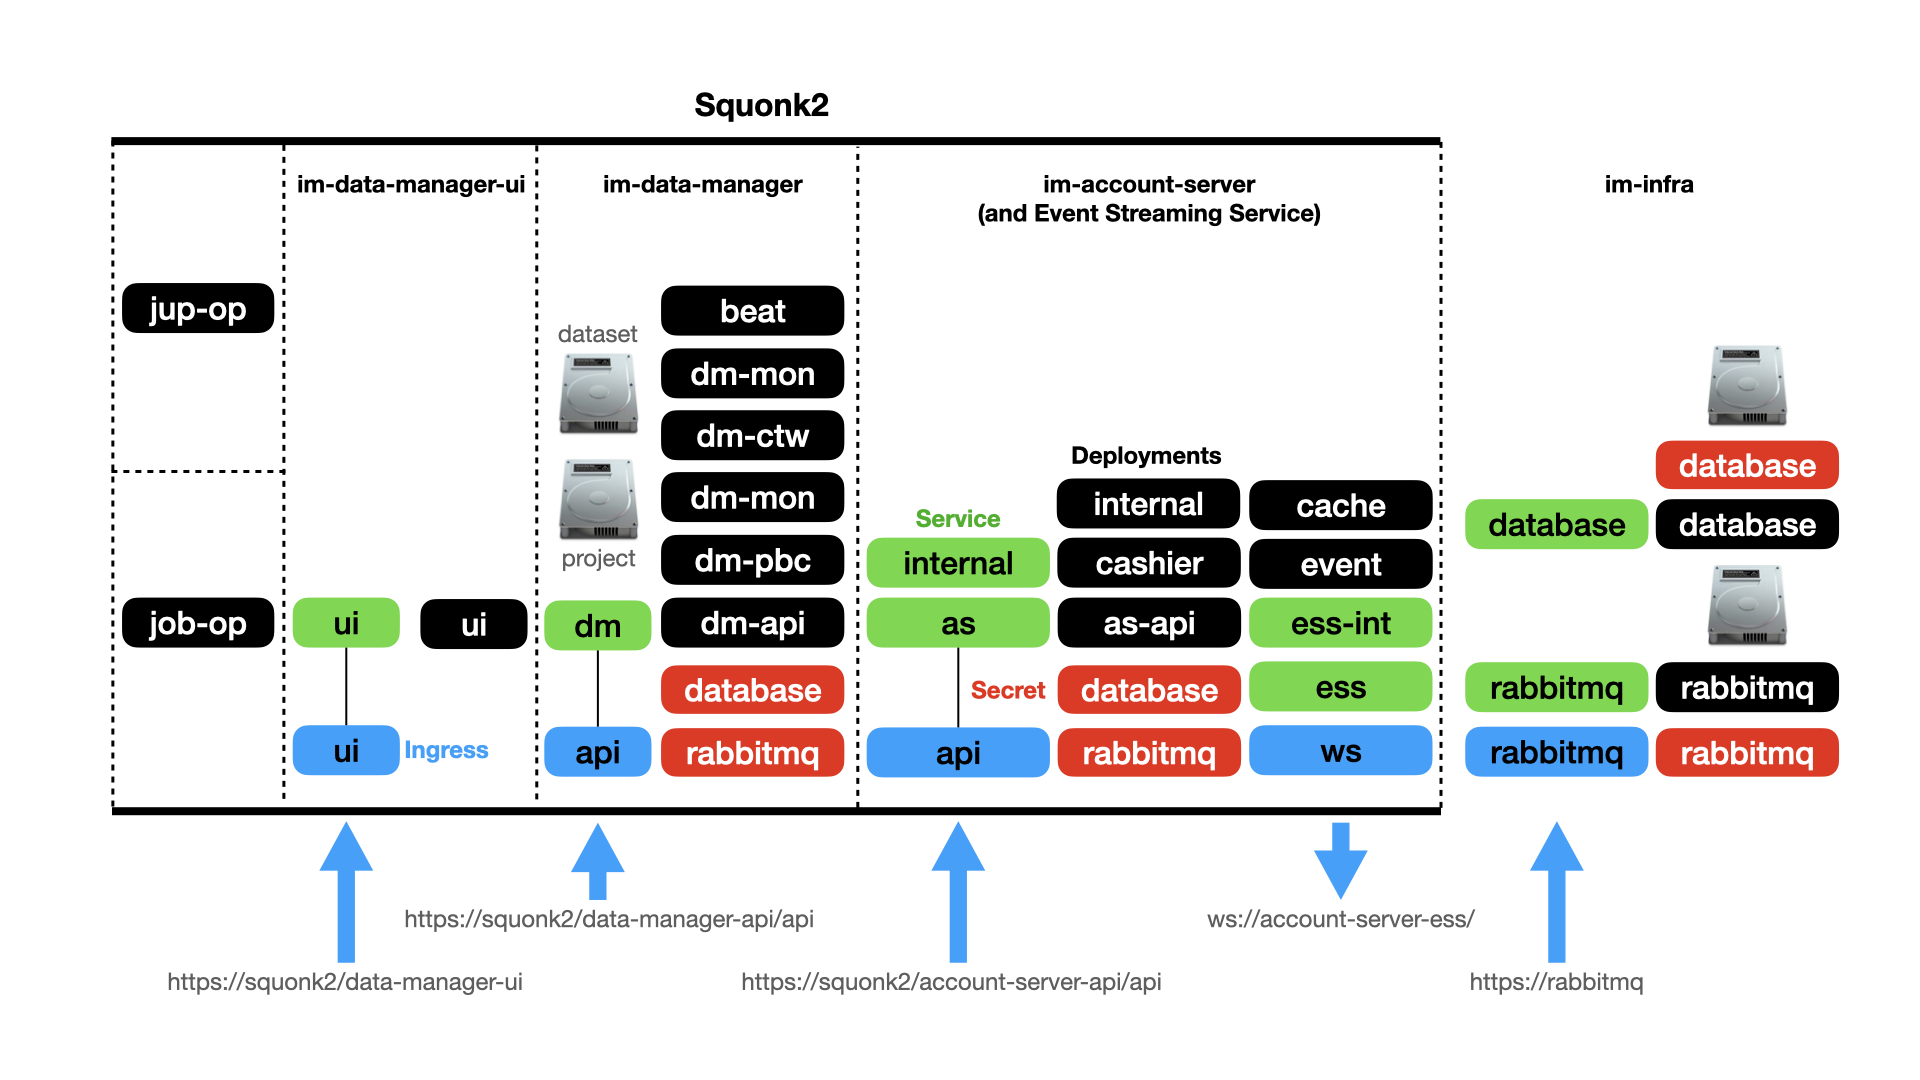
This guide will cover the installation of a Squonk2 environment that will result in the following Kubernetes namespaces, application components and storage volumes: -
Preparation
You will need…
- A linux/MacOS development machine (desktop/laptop) with at least 16GiB RAM and around 10-20Gi of Disk.
- GitHub and GitLab accounts
- A local kubernetes cluster (like the one described in our Docker Desktop or minikube notes). It must have: -
- At least 10 cores (unless you want to micro-manage all the Pod resources)
- Ideally 32Gi RAM
- At least 10GI disk
- An nginx ingress controller
- Labelled nodes
The author uses Docker Desktop on an ARM (Apple M3) host with 10 Cores, 48Gi RAM, and 96GI Disk available to the kubernetes cluster.
To simplify the execution of our playbooks we created the kubernetes-ansible-projects repository which has all our important Ansible repositories (and the ones you will use here) included as Git submodules. It provides you with an environment that you use for all of our playbook repositories. To get started, visit the kubernetes-ansible-projects repository and follow its installation and initialisation instructions.
Note: Not all our repositories are public, so you may need to be given access to them.
The Squonk2 container images we deploy here are built using ARM and Intel architectures and should run natively on Intel or ARM (and Apple silicon) machines.
1. Define hostnames
To simplify ingress routing we’ll rely on some hostnames that you can set in your /etc/hosts file. A Docker Desktop cluster can be found on 127.0.0.1 but minikube provides its own IP address that can be found by running minikube ip. Whatever you cluster’s IP address is, set appropriate mappings in your /etc/hosts file…
127.0.0.1 kubernetes.docker.internal
127.0.0.1 rabbitmq
127.0.0.1 squonk2
127.0.0.1 account-server-ess
If you’re planning to use our projects repo in a VS Code DevContainer you will need to adjust your Kubernetes configuration, which typically has a server on
127.0.0.1. This will not be available from within the DevContainer. To get around this simply replace the127.0.0.1value in yourserver:line (in the kubernetes configuration) withkubernetes.docker.internalas shown above. With this done your local cluster can be accessed from the DevContainer.
When doing this you will probably also need to add
insecure-skip-tls-verify: trueto your server declaration whilst also removing anycertificate-authority-data:line.
2. Deploy the Infrastructure (Priority Classes, a Database and RabbitMQ)
From the root of the kubernetes-ansible-projects repository, and its container or virtual environment run the following to install our set of PriorityClass objects, which also includes a default: -
pushd ansible-infrastructure
ansible-playbook site-core.yaml -e @parameters-local.yaml
We will be relying on these priority classes for all the Pods we deploy from now on, so getting the priority classes defined is important.
Now install the infrastructure applications (a database and RabbitMQ service) by running: -
ansible-playbook site.yaml -e @parameters-local.yaml
This will install the applications to the cluster im-infra Namespace.
Wait, and check that RabbitMQ is available at http://rabbitmq. The connection will be insecure but click through the warnings in your browser to see the RabbitMQ login page.
If you actually want to login, the rabbitmq credentials are stored in the
im-rabbitmqSecret in theim-infraNamespace where you will find auser(with the nameadmin) and apassword.
IMPORTANTLY if you CANNOT access the RabbitMQ console at http://rabbitmq then you should stop here and understand why. If you cannot access RabbitMQ it is extremely unlikely that you will be able to install and access the remaining applications.
3. Deploy the Account Server (AS)
Move to the Account Server (AS) Ansible project (assuming you’re currently in the ansible-infrastrure project)…
popd
pushd squonk2-account-server-ansible
Here you will need to ensure that you have some new environment variables setup as the AS and DM are containers hosted in a private (GitLab) registry, and you’ll need a pull token to access them. You might want to put these variables in your ~/.bash_profile or similar file to avoid having to set them every time you want to run the playbooks.
You’l find tokens under Notes in Keepass GitLab -> account-server -> GitLab Registry Deploy Token - (squonk2): -
export IM_DEV_AS_PULL_SECRET=<pull-secret>
The
parameters-local.yamlfile should define a default/sensible AS image tag. If you want to change it then simply define your own value, e.g.export IM_DEV_AS_IMAGE_TAG=4.3.0
Then run the playbook (using the same command we used for the infrastructure): -
ansible-playbook site.yaml -e @parameters-local.yaml
Check the AS pods are running and you can access the AS swagger web-page at https://squonk2/account-server-api/api/
If you’re logging in the client ID for the AS is
"account-server-api-local"
4. Deploy the Data Manager (DM)
Move to the Data Manager (DM) Ansible project…
popd
pushd squonk2-data-manager-ansible
You’ll now need the Data Manager GitLab deployment token. It’ll be in Keepass GitLab -> data-manager -> GitLab Registry Deploy Token - (squonk2): -
export IM_DEV_DM_PULL_SECRET=<pull-secret>
The
parameters-local.yamlfile should define a default/sensible DM image tag. If you want to change it then simply define your own value, e.g.export IM_DEV_DM_IMAGE_TAG=4.2.0
Now, just as before, run the playbook…
ansible-playbook site.yaml -e @parameters-local.yaml
Check the DM pods are running and you can access the DM swagger web-page at https://squonk2/data-manager-api/api/
If you’re logging in the client ID for the DM is
"data-manager-api-local"
This local installation of the DM includes the im-test collection of Jobs, which are automatically installed as the DM starts.
5. Deploy the DM Job Operator
Move to the Job Operator project…
popd
pushd squonk2-data-manager-job-operator-ansible
The
parameters-local.yamlfile should define a default/sensible Job Operator image tag. If you want to change it then simply define your own value, e.g.export IM_DEV_JOBO_IMAGE_TAG=31.1.0
Run the playbook…
ansible-playbook site.yaml -e @parameters-local.yaml
6. Deploy the DM Jupyter Operator
Move to the Jupyter Operator project…
popd
pushd squonk2-data-manager-jupyter-operator-ansible
The
parameters-local.yamlfile should define a default/sensible Jupyter Operator image tag. If you want to change it then simply define your own value, e.g.export IM_DEV_JUPO_IMAGE_TAG=31.1.0
Run the playbook…
ansible-playbook site.yaml -e @parameters-local.yaml
You will also need to add configuration to the DataManager Namespace, installing the jupyternotebooks.squonk.it ConfigMap by running the site_dm.yaml playbook, which you’ll find in the directory you’re in now: -
ansible-playbook site_dm.yaml -e @parameters-local.yaml
This installs RBAC configuration and public image variants and cost information.
7. Deploy the Data Manager UI
Move to the root of your clone of the UI repository: -
popd
pushd squonk2-data-manager-ui-ansible
You will need the UI keycloak client ID secret, and use it as the value for the following environment variable: -
export IM_DEV_UI_CLIENT_SECRET=?????
The
parameters-local.yamlfile should define a default/sensible UI image tag. If you want to change it then simply define your own value, e.g.export IM_DEV_UI_IMAGE_TAG=5.4.0
Then, like earlier, run: -
ansible-playbook site.yaml -e @parameters-local.yaml
Check the UI pods and the web-page at https://squonk2/data-manager-ui/
In order to login with the UI the keycloak server, at https://squonk.informaticsmatters.org/auth for local development, will need a “data-manager-ui-local” client ID in a “squonk” realm. The client should have “Client authentication” set along with “Standard flow” and “Direct access grants”. “Valid redirect URIs” and “Web Origins” are often set to “*” for local development. A “roles” Client Scope should be present, and have an assigned type of “Default”. It’s “realm roles” Mapper should have “Add to ID token” set. Typically “Add to access token”, “Add to userinfo”, and “Add to token introspection” are also set.
8. Deploying the AS Event Streaming Service (FastAPI/WS)
Before deploying the Event Streaming Service you will need the RabbitMQ Event Stream user credentials. If you are running an AS that supports the eventstream service a RabbitMQ user will have been created. Consult the rabbitmq secret in the im-account-server Namespace and look for the vhost_es_user_password property (the username will be eventstream).
When you have these, set the following environment variables before running the playbook.
Use the password you’ve found, it’s unlikely to be
password123as used in the example below
export IM_DEV_ESS_STREAM_USER=eventstream
export IM_DEV_ESS_STREAM_PASSWORD=password123
Now move to the root of the clone of the Event Streaming FastAPI WebSocket repository: -
popd
pushd squonk2-fastapi-ws-event-stream-ansible
The
parameters-local.yamlfile should define a sensible ESS image tag. If you want to change it simply define your own value by setting a suitable value using theIM_DEV_ESS_IMAGE_TAGenvironment variable.
Then, like earlier, run: -
ansible-playbook site.yaml -e @parameters-local.yaml
9. Loading additional Jobs and workflows into the DM
The DM is installed with a collection of im-test Jobs but you can also load more Job definitions if you have a URL to their manifests. A series of supported Job manifests and their URL locations can be found in the DM Wiki’s Day 1 Jobs article.
Using an admin account you can load your chosen selection of Jobs using the DM Swagger /admin/job-manifest PUT endpoint.
Similarly, you can load workflows into the DM using the DM Swagger /workflow POST endpoint where the DM repository has some example workflows that you can load.
- Give the workflow a “name” if you don’t like the default
"My Workflow" - In “definition_file” field click Choose File and select isolated-linear-im-test.yaml from your clone of the squonk2-data-manager repository’s
workflow-definitionsdirectory. This workflow uses the built-in set of Jobs so there’s no need to load any more in order to use it. - Leave the “scope” set to
"GLOBAL" - Click "Execute"
In response you should get something like this: -
{
  "id": "workflow-9d277044-c46d-4ff1-8a0e-9bff6f35a98a",
  "validated": true
}
The “id” will be unique for you. Importantly, the validated property should be true.
Once you have loaded the workflow you should be able to run it.
Resetting the kubernetes cluster
You can reset your local cluster using Rancher Desktop: -
- From Rancher Desktop select Troubleshooting -> Reset kubernetes